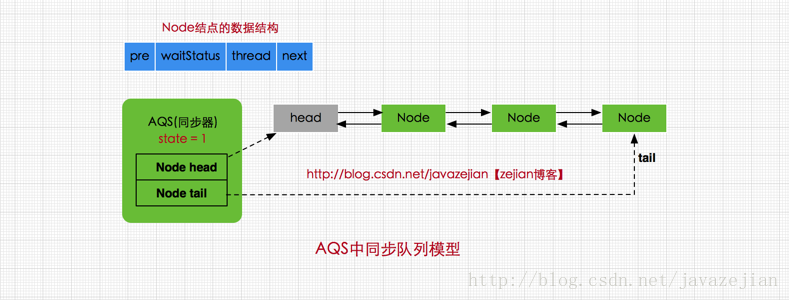
AQS是很多ReentranLock,CountdownLatch,Semaphore等基类,弄清楚AQS对锁和多线程的理解其实很重要。AQS的主要使用主要数据结构是CLH队列。
  static final class Node {
        //共享节点
        static final Node SHARED = new Node();
        //独占
        static final Node EXCLUSIVE = null;

     /**
     * 因为超时或者中断,节点会被设置为取消状态,被取消的节点时不会参与到竞争中的,他会一直保持取消状态不会转变为其他状态;
     */
    static final int CANCELLED =  1;

    /**
     * 后继节点的线程处于等待状态,而当前节点的线程如果释放了同步状态或者被取消,将会通知后继节点,使后继节点的线程得以运行
     */
    static final int SIGNAL    = -1;

    /**
     * 节点在等待队列中,节点线程等待在Condition上,当其他线程对Condition调用了signal()后,改节点将会从等待队列中转移到同步队列中,加入到同步状态的获取中
     */
    static final int CONDITION = -2;

    /**
     * 表示下一次共享式同步状态获取将会无条件地传播下去
     */
    static final int PROPAGATE = -3;

    //等待状态
    volatile int waitStatus;
    //前驱结点
    volatile Node prev;
    //后驱节点
    Node nextWaiter;


        final boolean isShared() {
            return nextWaiter == SHARED;
        }
        final Node predecessor() throws NullPointerException {
            Node p = prev;
            if (p == null)
                throw new NullPointerException();
            else
                return p;
        }

        Node() {    // Used to establish initial head or SHARED marker
        }

        Node(Thread thread, Node mode) {     // Used by addWaiter
            this.nextWaiter = mode;
            this.thread = thread;
        }

        Node(Thread thread, int waitStatus) { // Used by Condition
            this.waitStatus = waitStatus;
            this.thread = thread;
        }
    }
AQS其实就关键的几个变量
//指向同步队列队头
private transient volatile Node head;

//指向同步的队尾
private transient volatile Node tail;

//同步状态,0代表锁未被占用,>=1代表锁已被占用
private volatile int state;
其实就是双向的队列
再来看看入队列:
  private Node addWaiter(Node mode) {
        Node node = new Node(Thread.currentThread(), mode);
        // Try the fast path of enq; backup to full enq on failure
        Node pred = tail;
        if (pred != null) {
            node.prev = pred;
            if (compareAndSetTail(pred, node)) {
                pred.next = node;
                return node;
            }
        }
        enq(node);
        return node;
    }
尝试快速地往队列中添加节点,如果添加失败那么会走入的enq
private Node enq(final Node node) {
        for (;;) {
            Node t = tail;
            if (t == null) { // Must initialize
                if (compareAndSetHead(new Node()))
                    tail = head;
            } else {
                node.prev = t;
                if (compareAndSetTail(t, node)) {
                    t.next = node;
                    return t;
                }
            }
        }
    }
可以看到上边两个方法都用了CAS来保证的数据的添加的高效。而且AQS是通过死循环来添加末尾节点的,只有添加成功才会返回。
出队
CLH出队列的时候也是遵循的FIFO的。首节点的线程释放同步状态后,将会唤醒它的后继节点(next),而后继节点将会在获取同步状态成功时将自己设置为首节点,这个过程非常简单,head执行该节点并断开原首节点的next和当前节点的prev即可,注意在这个过程是不需要使用CAS来保证的,因为只有一个线程能够成功获取到同步状态。
获取同步状态
 public final void acquire(int arg) {
        if (!tryAcquire(arg) &&
            acquireQueued(addWaiter(Node.EXCLUSIVE), arg))
            selfInterrupt();
    }


tryAcquire:去尝试获取锁,获取成功则设置锁状态并返回true,否则返回false。该方法自定义同步组件自己实现,该方法必须要保证线程安全的获取同步状态。
 addWaiter:如果tryAcquire返回FALSE(获取同步状态失败),则调用该方法将当前线程加入到CLH同步队列尾部。
acquireQueued:当前线程会根据公平性原则来进行阻塞等待(自旋),直到获取锁为止;并且返回当前线程在等待过程中有没有中断过。
selfInterrupt:产生一个中断。
acquireQueued方法为一个自旋的过程,也就是说当前线程(Node)进入同步队列后,就会进入一个自旋的过程,每个节点都会自省地观察,当条件满足,获取到同步状态后,就可以从这个自旋过程中退出,否则会一直执行下去。如下:
 final boolean acquireQueued(final Node node, int arg) {
        boolean failed = true;
        try {
            //中断标志
            boolean interrupted = false;
            /*
             * 自旋过程,其实就是一个死循环而已
             */
            for (;;) {
                //当前线程的前驱节点
                final Node p = node.predecessor();
                //当前线程的前驱节点是头结点,且同步状态成功
                if (p == head && tryAcquire(arg)) {
                    setHead(node);
                    p.next = null; // help GC
                    failed = false;
                    return interrupted;
                }
                //获取失败,线程等待--具体后面介绍
                if (shouldParkAfterFailedAcquire(p, node) &&
                        parkAndCheckInterrupt())
                    interrupted = true;
            }
        } finally {
            if (failed)
                cancelAcquire(node);
        }
    }
本文由 妖言君 创作,采用 知识共享署名4.0 国际许可协议进行许可
本站文章除注明转载/出处外,均为本站原创或翻译,转载前请务必署名
最后编辑时间为: Jan 10, 2021 at 03:05 pm